This guide will show you how to create a SIP Profile, rename a SIP Profile and delete a SIP Profile for Skype Gateway.
A SIP Profile is a SIP user account that contains all of the configuration and user data for your Skype Connect service.
To create a new SIP Profile is easy, just follow the steps below:
To create a new SIP Profile is easy, just follow the steps below:
- Sign in to Skype Manager.
- Click Features in the toolbar.
- In the menu on the left, click Skype Connect.
- Click Set up a SIP Profile.
- Enter a name for the new profile into the Choose a profile name field.
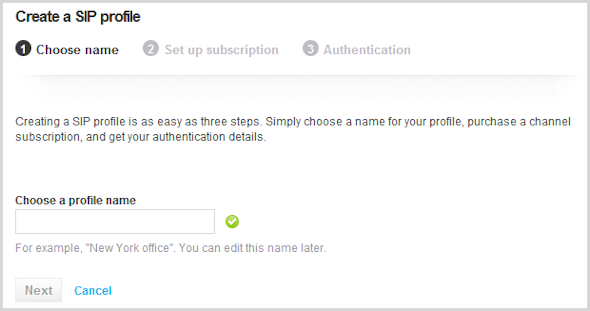
6. Click Next.
7. Enter the maximum number of calling channels that you think you will need.
7. Enter the maximum number of calling channels that you think you will need.
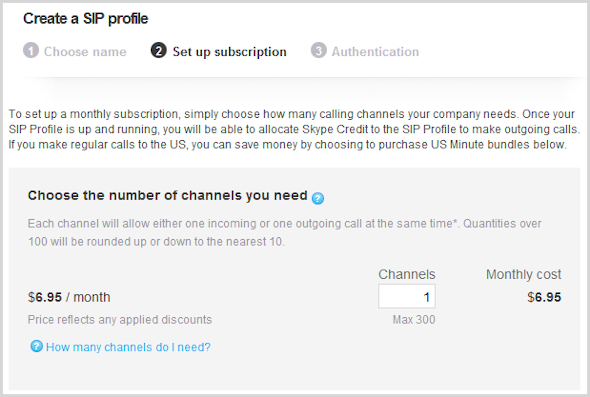
Each channel will allow either one incoming or one outgoing call. Skype Connect supports up to 300 simultaneous calling channels per SIP Profile, enabling up to 300 concurrent conversations.
If you're not sure of how many channels you think that you may need, click How many channels do I need? to display guidelines on the suggested number of channels, based on number of employees.
A channel subscription is for 30 days from the day it is bought and, unless cancelled or changed, is subsequently renewed automatically every 30 days. Skype Credit for channel subscriptions is taken from your Skype Manager balance, not from any Skype Credit allocated to the SIP Profile.
8. If you call the US a lot, you could save on your calling with US minute bundles. Each bundle includes a monthly allowance of 5,000 minutes to call mobiles and landlines in the US. Click Add US minute bundles and enter the number of bundles you think you will need. The total cost of the bundles per month will automatically be displayed.
Important: The number of US minute bundles you enter cannot exceed the number of channels you have entered.
If the bundle’s minutes run out before the next renewal date, calls to the US will be charged from your Skype Manager's available Skype Credit balance at Skype Connect's standard call rates.
9. Click Buy now. The profile's registration details are displayed.
The password will be sent to your registered email address.
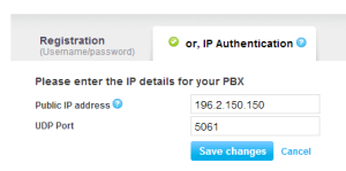
10. Select the IP Authentication tab, enter your public IP address and UDP port in the fields displayed that host in your Skype Gateway configuration and click Continue.
Learn more about Skype Gateway Configuration.
If you're not sure of how many channels you think that you may need, click How many channels do I need? to display guidelines on the suggested number of channels, based on number of employees.
A channel subscription is for 30 days from the day it is bought and, unless cancelled or changed, is subsequently renewed automatically every 30 days. Skype Credit for channel subscriptions is taken from your Skype Manager balance, not from any Skype Credit allocated to the SIP Profile.
8. If you call the US a lot, you could save on your calling with US minute bundles. Each bundle includes a monthly allowance of 5,000 minutes to call mobiles and landlines in the US. Click Add US minute bundles and enter the number of bundles you think you will need. The total cost of the bundles per month will automatically be displayed.
Important: The number of US minute bundles you enter cannot exceed the number of channels you have entered.
If the bundle’s minutes run out before the next renewal date, calls to the US will be charged from your Skype Manager's available Skype Credit balance at Skype Connect's standard call rates.
9. Click Buy now. The profile's registration details are displayed.
The password will be sent to your registered email address.
10. Select the IP Authentication tab, enter your public IP address and UDP port in the fields displayed that host in your Skype Gateway configuration and click Continue.
Learn more about Skype Gateway Configuration.
Select Set up incoming calls and Allocate Skype Credit at the bottom of the screen and follow the instructions to set up your preferred settings for incoming calls and to assign Skype Credit.
To rename a SIP Profile:
To delete a SIP Profile:
Before deleting a SIP Profile, note that deleting a SIP Profile causes:
To rename a SIP Profile:
- Sign in to Skype Manager.
- Click Features > Skype Connect and select View profile next to the SIP Profile that you want to rename.
- Click anywhere within the Profile name row.
- Click in the name field and enter the new name.
- Click Save.
To delete a SIP Profile:
Before deleting a SIP Profile, note that deleting a SIP Profile causes:
- Any remaining Skype Credit allocated to that SIP Profile to be returned to the Skype Manager balance.
- Skype Numbers to be returned to Skype Manager for reallocation.
- Call history to be lost. If you need a record of the call history, you can take one using the reporting options before deleting the SIP Profile.
- Sign in to Skype Manager.
- Click Features > Skype Connect and select View profile next to the SIP Profile that you want to delete.
- Click Delete this profile.
- Click Delete to confirm.
Related Posts
- How do I retrieve a SIP Profile’s configuration for Skype Gateway?
- How do I associate business accounts with a SIP Profile for inbound calling to Skype Gateway?
- How can I add new members to my Skype Manager?
- How do I invite members with personal Skype accounts to join my Skype Manager?
- How do I organize members of my Skype Manager into groups?
- How do I manage my Skype Connect channel subscriptions?
- How do I manage Caller ID on a SIP Profile?
- How do I assign Skype Numbers to a SIP Profile for Skype Gateway?
- How do I buy Skype Credit in my Skype Manager for Skype Gateway?
- How do I allocate Skype Credit to a SIP Profile for outbound calling?
- How do I view reporting on a SIP Profile for Skype Gateway?
 RSS Feed